



Shaping Your Spinz 808s: A Guide to Using Soundtoys Decapitator

The Spinz 808 is a staple for many producers, known for its powerful low-end and sharp attack. While potent on its own, adding some tasteful saturation or distortion can elevate its impact and fit within your mix. Soundtoys Decapitator is a versatile plugin capable of a wide range of analog-modeled saturation and distortion, making it a valuable tool for enhancing your 808s.
This guide will walk you through using Decapitator on your Spinz 808s, from subtle warmth to more aggressive distortion, providing practical techniques and tips to achieve the sound you're after.
Why Use Decapitator on Spinz 808s?
Decapitator offers various ways to enhance your 808:
-
Adding Warmth and Body: Introduce subtle harmonic richness to make the 808 sound fuller and more present.
-
Enhancing the Attack: Bring out the transient punch and definition, helping it cut through the mix.
-
Creating Distortion and Aggression: Add character and grit, pushing the 808 into unique distorted territories.
-
Tonal Shaping: Utilize the built-in EQ to refine the frequency balance and carve out space in your mix.
-
Introducing Analog Character: Imbue your 808s with the sonic signature of classic analog gear.
Understanding the Decapitator Interface:
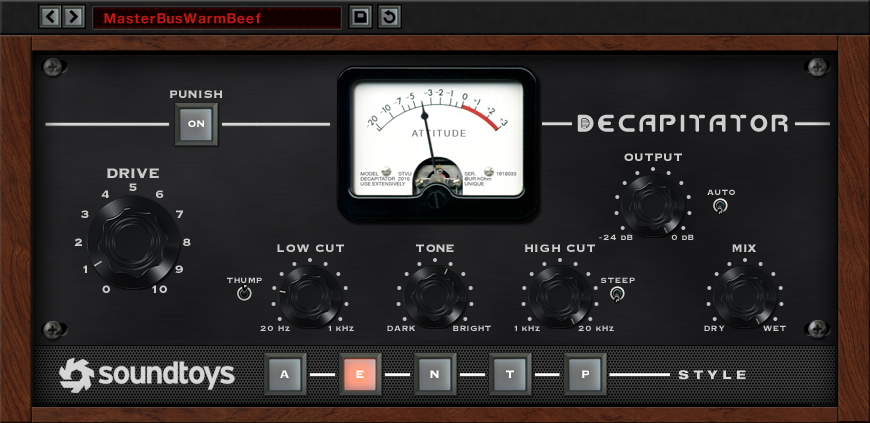
Before we explore specific applications, let's understand the key controls:
-
Drive: This controls the amount of input signal fed into the saturation/distortion circuit. Higher drive results in more intense effects.
-
Style: Decapitator offers five distinct saturation styles, each modeled after classic analog hardware:
-
"A" (Ampex®): Smooth tape saturation, suitable for subtle warmth and cohesion.
-
"E" (EMI®): Punchy transistor distortion, good for adding bite and edge.
-
"N" (Neve®): Thick transformer saturation, adds weight and fullness.
-
"T" (Triode): Tube-like saturation, ranging from warm to fuzzy.
-
"P" (Pentode): Harder tube distortion, for a more aggressive and gritty sound.
-
-
Tone: An EQ section for shaping the distorted signal, featuring:
-
Hi Cut: Attenuates high frequencies to tame harshness.
-
Lo Cut: Attenuates low frequencies to prevent muddiness.
-
Tone: A tilt EQ that simultaneously boosts or cuts high and low frequencies for quick tonal adjustments.
-
-
Punish: An extra gain stage to push the signal harder into distortion, creating more extreme saturation. Use cautiously.
-
Auto Gain: Attempts to maintain a consistent perceived loudness as you adjust the Drive control, helpful for auditioning settings.
-
Mix: Blends the processed signal with the original, allowing for parallel processing techniques.
-
Output: Controls the overall output level of the plugin.
Applying Decapitator to Your Spinz 808s: A Step-by-Step Approach:
Here's how to effectively use Decapitator on your Spinz 808 track:
1. Insert Decapitator: Place the Decapitator plugin as an insert on the audio track containing your Spinz 808.
2. Subtle Enhancement: Adding Warmth and Thickness:
-
Style: Start with the "A" (Ampex) or "N" (Neve) style for a smoother, warmer effect.
-
Drive: Begin with a low Drive setting, around 1-3. Gradually increase it while listening closely. The goal is a subtle thickening of the 808, making it feel more substantial without obvious distortion.
-
Tone: Use the Tone knob to add a touch of high-end clarity or low-end weight as needed. Small adjustments can help the 808 sit better in the mix.
-
Mix: Keep the Mix knob at 100% for full application of the effect.
3. Enhancing the Attack:
-
Style: Experiment with the "E" (EMI) style for a more aggressive and defined transient.
-
Drive: Increase the Drive slightly. You should notice the initial attack becoming more prominent and defined.
-
Tone: A slight boost in the upper-mid frequencies using the Tone knob can further enhance the attack and clarity.
-
Mix: Keep the Mix at 100% for the full effect.
4. Adding Distortion and Aggression:
-
Style: Explore the "T" (Triode) or "P" (Pentode) styles for more pronounced distortion. The "E" (EMI) can also be pushed for a raw transistor sound.
-
Drive: Increase the Drive significantly. Experiment with different levels to find the desired balance between controlled aggression and more extreme distortion.
-
Punish: Engage the Punish button for an added layer of gain and intensity. Be mindful of the output level.
-
Tone: Use the Hi Cut to manage any harsh high frequencies introduced by the distortion. The Lo Cut can help tighten the low end if it becomes muddy.
-
Mix: Experiment with the Mix knob to blend the distorted 808 with the original clean signal. This can create interesting textures and prevent the distortion from becoming overwhelming.
5. Fine-Tuning with the Tone Section:
-
Hi Cut: Use this to roll off any harsh or unwanted high frequencies that can arise with heavier distortion. Subtle adjustments can smooth the sound.
-
Lo Cut: Crucial for preventing low-end muddiness, especially with more aggressive settings. Experiment to find the point where the sub-bass remains powerful but the lower mids are clear.
-
Tone: Use this to quickly brighten or darken the overall tone of the processed 808.
Practical Tips and Techniques:
-
Parallel Processing: Set up Decapitator on an auxiliary track and send your 808 signal to it. Dial in a more extreme distorted sound on the aux track and blend it with the original clean signal to taste. This allows you to add character without completely sacrificing the integrity of the original sound.
-
Automation: Automate the Drive or Mix knob to create dynamic shifts in the intensity of the saturation or distortion throughout your track. This can add movement and interest to your bassline.
-
Layering: Consider using multiple instances of Decapitator on the same 808 track with different settings. For example, a subtle "A" style for warmth followed by a more aggressive "E" style for bite.
-
Context is Key: Always evaluate your 808 in the context of the entire mix. What sounds good in isolation might not work well with other instruments. Adjust the Decapitator settings to ensure the 808 sits properly and complements the other elements.
-
Experiment with Input Gain: The input level of your 808 signal can influence how Decapitator responds. Experiment with adjusting the gain before the plugin to achieve different levels of saturation.
-
Don't Be Afraid to Experiment: Decapitator is capable of a wide range of sounds. Don't hesitate to explore different settings and see what unique textures you can create.
Troubleshooting Common Issues:
-
Muddy Low End: Use the Lo Cut filter to remove unwanted low frequencies. Experiment with different Style settings, as some are inherently less prone to muddiness.
-
Harsh High Frequencies: Engage the Hi Cut filter to tame excessive brightness. Adjust the Tone knob to reduce high frequencies.
-
Loss of Dynamics: Reduce the Drive level or use the Mix knob to blend in more of the original, unprocessed signal.
-
The 808 Gets Lost in the Mix: Ensure you're not cutting too much low end with the Lo Cut. Try slightly boosting the low frequencies with the Tone knob.
______________________________________________________________
FL Studio Production Techniques & Tips:
Exploring FL Studio's Features & Updates:
Looking Ahead: