FL Studio Chord Generator
Piano Roll Chord Progression Tool

Decoding the Language of Chords
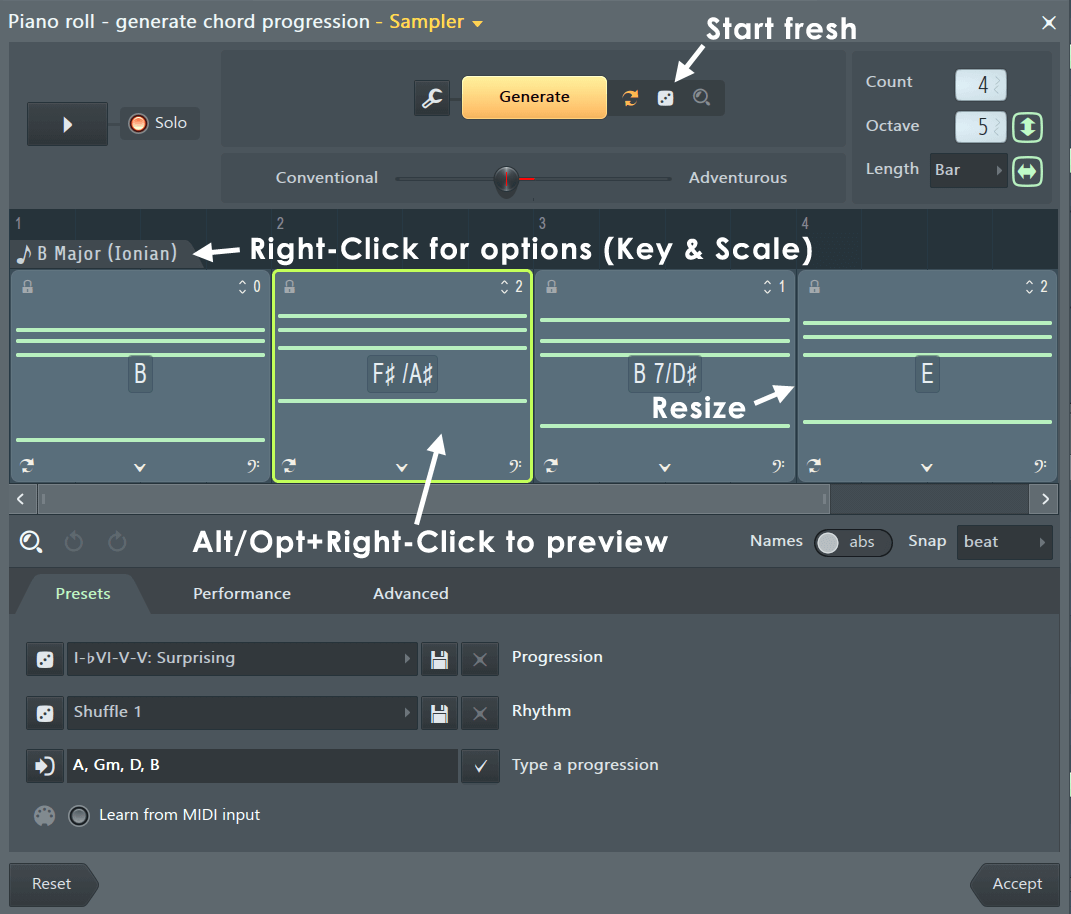
Imagine chords as little packages of sonic flavor. They're basically groups of notes that sound harmonious when played together. Now, string a few of these flavorful packages together in a repeating sequence, and you've got a chord progression. This sequence isn't just a random assortment; the magic happens when each chord "naturally" flows into the next. Think of it as a conversation where each phrase builds upon the previous one, creating a sense of tension and release, driving the emotional narrative of your music. What makes this flow "natural"? Usually, it means the chords are related harmonically, often drawn from the same musical scale. If you're curious about the nuts and bolts, FL Studio's manual has a great section on Scales & Keys (Key Signatures) that'll illuminate how these progressions are built. NOTE: You can even dictate the scale right within the tool! Just (Right-Click) the Key & Scale options – you'll see it in the image above (referring to the image in the original context).
Chord Progressions: The Architect of Song Structure
Beyond the emotional landscape, chord progressions are also the unsung heroes of song structure. They define the different sections of your track. Even if you haven't formally studied music theory, years of listening to your favorite tunes have probably ingrained a basic song structure in your mind. Think of the classic pop song blueprint:
-
Intro (4 bars): The opening act, setting the stage for what's to come.
-
Verse (8 or 16 bars): The recurring melody and chord progression, often with evolving lyrics that tell a story.
-
Chorus / The Drop (8 or 16 bars): The earworm! The catchy, repeating heart of the song, both musically and lyrically.
-
Verse (8 or 16 bars): Back for another round, building on the narrative.
-
Chorus / The Drop (8 or 16 bars): Because you can't get enough!
-
Bridge (4 or 8 bars): A detour, offering a change in melody and lyrics, breaking up the repetition and often building anticipation for the final chorus.
-
Chorus / The Drop (8 or 16 bars): The grand finale (before the actual finale!).
-
Outro (4 bars): The send-off, which could be a repeated chorus, a gradual fade, or something entirely unique.
A distinct chord progression will typically underpin each of these sections. But let's be honest, hunting for the perfect progression through trial and error can feel like searching for a needle in a haystack. That's where the FL Studio Chord Progression Tool enters the scene, a true game-changer! It's like having a pocket-sized music theory expert, instantly generating valid and emotionally resonant chord sequences with just a few clicks. Ready to dive in? Check out the 'Tips on using the tool' below!
Getting Hands-On: Tips for Taming the Tool
First things first: chord progressions shine brightest with sustained sounds. Think lush pianos or atmospheric "pad" synths. Make sure the instrument you're using is polyphonic, meaning it can play multiple notes simultaneously. Don't worry about the perfect sound right away – you can always swap it out later.
Here's how to get started:
-
Your First Progression: As soon as you open the tool, you'll be greeted with a ready-made 4-chord progression. Hit Play to hear it in action, or get granular and preview individual chords in any order by **(Alt/Opt+Right-Click)**ing on them.
NOTE: FL Studio will automatically switch to Pattern mode if you're not already there. The Chord Progression Tool needs this to function correctly.
-
Sculpting Your Sound: Tweaking the Results: Now for the fun part – making it your own!
-
Fresh Start? Hit Regenerate: Don't vibe with the initial suggestion? No problem! Click re-Generate for a brand new progression.
NOTE: This is clever! The tool remembers previous suggestions and even any existing notes in your Piano roll, helping you avoid repetition. If you feel like you're in a rut, hit the 'Dice' icon for a completely fresh set of ideas.
-
Dial in Your Vibe: The Conventional - Adventurous Slider: This is where you fine-tune the "flavor" of your progression. Sliding towards Conventional will yield progressions commonly heard in popular music – familiar and comfortable. Push it towards Adventurous, and you'll venture into jazzier territory with more complex and unexpected harmonies.
NOTE: Go full "Adventurous" and prepare for some outside-the-box sounds! It's not where you'll typically find pop hits, but it's fantastic for exploring new sonic landscapes.
-
Swap Individual Chords: Found a progression you mostly like, but one chord feels off? Click the 'Show alternative Chords' (down arrow) at the bottom of that chord. A pop-up list will appear, offering a range of alternatives. Preview them with (Alt/Opt+Right-Click).
-
Rearrange and Remix: Want to change the order of the chords? (Right-Click) on a chord and select Swap to experiment with different sequences and create a new feel.
-
Lock in Your Favorites: Found a chord you absolutely love? Click the Lock icon on that chord. Now, when you hit Generate, that chord will remain untouched, while the others get a refresh.
-
-
Under the Hood: Advanced Controls: **(Right-Click)**ing on a chord unlocks even more possibilities. Explore the options – you might discover hidden gems! To change the fundamental note (Tonic) and the overall Scale, (Right-Click) the Tab above the first chord in the sequence. Remember, Major Scales tend to sound brighter and happier, while minor Scales often evoke a more melancholic or introspective mood.
-
Bringing it Home: Moving On: Happy with your creation? Click 'Accept', and the glorious chord progression will be seamlessly added to your selected Pattern. Now the real fun begins – building your track around this foundation in the Playlist.
TIP: One of the fastest ways to craft a compelling melody is to pull notes directly from the chords you've just generated. Even randomly selecting notes from the current chord can sound surprisingly good! Give it a try and then refine. Similarly, for basslines, start with the lowest note of each chord, experiment with rhythm, and see where it takes you.
Important Nuggets to Remember:
-
Snap to Scale Magic: The tool automatically engages 'Snap to scale' in your Piano roll. This ensures that any notes you add later will naturally harmonize with your generated chord progression (as long as 'Snap to scale' remains active).
-
Chord Grouping: By default, the notes within the generated chords are 'Grouped'. This can be helpful for editing and manipulation. To ungroup them, simply select the chord(s) and press (Alt/Opt+G).
So, you're generating chords, tweaking them with right-clicks, and feeling the creative juices flowing. But the journey doesn't stop there! The top panel of the Chord Progression Tool is your command center, packed with options to shape your progressions in powerful ways. Think of these controls as the conductor's baton, allowing you to orchestrate the harmonic direction of your music with precision and flair. Let's explore what each of these tools brings to the table:
-
Conducting Your Creation: Play and Preview: The familiar Play button does exactly what you'd expect – it starts and stops the playback of your current chord progression. But here's a pro-tip: (Alt/Opt+Right-Click) directly on any chord to instantly preview its sound without starting the full sequence. This is invaluable for quickly auditioning individual chords and making those crucial micro-decisions.
-
Isolating the Harmony: The Solo Button: Need to focus solely on your freshly generated chords? Hit the Solo button. This mutes any pre-existing notes in your Piano roll, allowing you to hear the pure essence of your chord progression in isolation. It's perfect for assessing the overall harmonic feel without any melodic distractions.
-
The Spanner: Your Note Generation Workshop: Click on the Spanner icon, and you'll unlock a submenu dedicated to how the tool generates notes within your chords. Think of this as fine-tuning the building blocks of your harmony.
-
Notes - Main & Bass: Here, you decide which parts of the chord get the note treatment. Deselecting both Main and Bass means the tool will display the chords but won't actually create any notes. Why would you do this? Imagine analyzing the chords on one instrument and then wanting to apply the same progression to a different instrument on another channel. This gives you that flexibility!
-
Notes - Bass (The Secret Weapon): Want an instant bassline that perfectly complements your existing melody? Run the Analyze Generation Mode with only Bass selected. The tool will cleverly generate bass notes that harmonize with your pre-existing Piano roll content. Boom! Instant groove.
-
Non-chord notes: Handling Existing Melodies: This section dictates how the tool interacts with notes that were already present in your Piano roll before you opened the Chord Progression Tool. Choose wisely!
-
Replace all: Out with the old, in with the new! This option nukes any pre-existing notes, making way for the fresh chord tones. Keep in mind that the Analyze mode will still consider these deleted notes during its analysis.
-
Replace clashing: A more surgical approach. This option only removes notes that fall within the same note range as your generated chords (as defined by the Main and Bass settings). It's a good way to clean up potential harmonic clashes.
-
Keep: Harmony lovers, rejoice! This option preserves your existing notes and instructs the tool to generate chords that will hopefully complement them. It's a bit of a "let's see what happens" approach, relying on the AI to find a harmonious fit. Your ears are the ultimate judge here!
-
Snap: A clever creative tool! This keeps your existing notes but "snaps" any that are outside the generated chord tones to the nearest in-key note. Think you have a cool arpeggio but want it to perfectly align with a chord progression? This is your answer!
-
-
-
Generate: The Spark of Creation: Feeling stagnant? Hit Generate! This powerful button is your go-to for fresh harmonic ideas. The tool intelligently regenerates any chords that aren't locked (more on that padlock icon later), taking into account overall harmonic coherence, smooth transitions between chords, sub-sequences for longer progressions, rhythmic placement, chord extensions, and even basslines. It's like having a mini-band in a box!
-
Rework: Building on What You Have: Think of Rework (the two arrows icon) as a refined version of Generate. It intelligently considers your previously generated chords, any existing notes in your Piano roll, and even the key signature that was present when you opened the tool. It’s a fantastic way to iterate on existing ideas while maintaining a sense of continuity. Plus, it keeps the key consistent with your initial chord or analysis.
-
Start Over: The Clean Slate (with a Twist): Need a fresh perspective? Click the Dice icon (Start over). This is similar to a reset button, wiping away any changes you've made to the chords themselves and generating a completely new progression. However, it cleverly preserves your global settings like the generation parameters, chord count, octave, and length. Even the scale gets a little shake-up, being randomized with each regeneration!
-
Analyze: The Harmonic Detective: Got a melody but no chords? That's where Analyze comes in. This mode (only available when you already have notes in your Piano roll) puts on its detective hat and tries to find a matching chord sequence for your existing notes. Since it's not entirely predictable, you'll get slight variations on the progression each time you hit it. Pro-tip: This mode shines when you want automatic accompaniment for an existing melody. Set your desired scale, then hit Analyze to generate a fitting chord progression.
-
Count: Shaping the Length of Your Journey: The Count setting lets you quickly adjust the number of chords in your progression. Want to add more harmonic movement? Increase the count. Need to simplify things? Decrease it. Any added chords will be generated automatically, keeping the creative flow going.
-
Octave: Placing Your Chords in the Sonic Spectrum: The Octave control determines the vertical placement of your chords. Want them lower and moodier? Shift the octave down. Need them higher and brighter? Shift it up!
-
Transpose Toggle: Shifting Perspectives: The Transpose button (vertical double arrow icon) dictates how the Octave control affects existing chords. When selected, changing the octave will transpose all your existing chords. Deselect it, and the octave change will only apply to newly added chords or those generated with the Dice icon.
-
Length: Defining the Rhythmic Feel: The Length setting determines the initial duration of any chords you add to the end of your progression. Crucially, it also gives the AI model a sense of the basic rhythmic unit within your progression.
-
Rescale Toggle: Stretching and Compressing Time: Similar to the Transpose button, the Rescale button (horizontal double arrow icon) controls how changes to the Length setting affect existing chords. With it selected, altering the length will proportionally adjust the duration of your existing chords. Deselect it, and the length change will only apply to newly added chords or those generated with the Dice icon.
-
The Conventional-Adventurous Slider: Your Musical Spice Rack: This is where you dial in the "flavor" of your progressions. Slide it to the left for more Conventional progressions – those familiar, pleasing sequences with a higher proportion of in-key notes and smoother harmonies. Slide it to the right towards Adventurous, and prepare for a wilder ride! You'll encounter more unusual and experimental progressions, potentially with added or out-of-scale notes and less predictable transitions. Pro-tip: Cranking this all the way to the right is practically a requirement when composing the soundtrack for a caffeinated squirrel's escapades.
Beyond the Basics: Exploring Presets, Performance, and Advanced Techniques
We've journeyed through the core functionalities of the Chord Progression Tool, but the adventure doesn't end there! This final stretch unveils powerful tools for instant inspiration, rhythmic manipulation, and fine-grained control over the AI's creative process. Buckle up, because we're about to unlock even more potential within this incredible plugin.
Instant Inspiration: Diving into Presets
Sometimes, you just need a spark to ignite your creativity. The Presets section is your go-to for instant harmonic gratification. Think of it as a library of pre-built chord progression blueprints, ready to be dropped into your project and customized.
-
Progression Presets: A World of Harmonic Flavors: Click on the Progression dropdown, and you'll find a curated list of popular chord progressions. From classic pop staples to more adventurous sequences, this is a fantastic starting point for any genre. NOTE: If your current progression has more or fewer than 4 chords, the selected 4-chord preset will intelligently repeat or adapt to fit your existing structure, repeating every (4 x Length) bars. If you have extra chords, the tool will generate complementary ones. If you have too few, some of the preset chords will be omitted.
-
Randomize Your Inspiration: Feeling adventurous? Hit the Random (Dice icon) to instantly apply a random progression preset. It's a great way to stumble upon unexpected harmonic gems.
-
Saving Your Sonic Signatures: Crafted a chord progression you absolutely love? Click the Save (Disk icon) to name and save it as a User Progression preset. This allows you to build your own personalized library of harmonic starting points.
-
Decluttering Your Creativity: Got a user preset that's no longer sparking joy? Select it and hit the Delete (X icon) to remove it from the list.
-
Rhythmic Grooves at Your Fingertips: The Rhythm section lets you apply rhythmic patterns to your chord sequence, adding instant movement and groove. The rhythm is applied in blocks of (4 x Length). NOTE: The tool might add chords as needed to fill out the rhythm, and if you have extra chords, they'll be used to split the rhythmic sections. Feeling lucky? Hit the Random (Dice icon) to generate a new chord rhythm on the fly.
-
Type Your Way to Harmony: The Type in progression text box offers a direct and powerful way to input your own chord sequences. Simply type or paste a sequence of chords, separated by commas, dashes, or spaces. You can use chord names (e.g., C, G, Am, F), capital letters only, or even Roman numerals (e.g., I, V, vi, IV). Roman numeral chords will be built based on your specified root note. The typed sequence will start from your currently selected chord.
-
Special Characters – Your Secret Input Language:
-
= (Equals): Keep the current chord in this position.
-
. (Period): Repeat the previous chord in the text (not necessarily the previous chord in your existing progression).
-
? (Question Mark): Regenerate the chord at this position.
-
Valid Separators: [|-, ] – use any of these to separate your chord entries.
-
-
-
Grab Your Current Vibe: Click the Get Current Progression (In arrow icon) to automatically populate the text box with your existing chord sequence. Pro-tip: This is a super-fast way to edit individual chords within your current progression.
-
Commit to Your Creation: Hit the Accept (Tick icon) to render the typed progression. If no chord is selected, the new progression will fill in from the beginning. If you have chords selected, those will be altered first in order, but if your typed progression is longer, additional chords will be modified or added to complete the sequence.
-
Learn from Your MIDI Controller: Want to intuitively input chords? Select a chord in your progression to replace, click the MIDI icon(the selected chord will turn red), and play a replacement chord on your MIDI controller. It's a fantastic way to experiment with different voicings and inversions in real-time.
Performance Power: Adding Rhythmic and Expressive Touches
The Performance section is where you breathe life and movement into your static chord progressions. It's all about adding rhythmic variation, dynamic nuances, and that human touch.
-
Regenerate Performance: A Fresh Take on Rhythm: Click Regenerate to create a new rhythmic variation based on your current settings. NOTE: This will replace the performance pattern associated with each affected chord with the one currently selected in the Pattern combo box.
-
Copy and Paste Performance: Found a rhythmic pattern you love? Use Copy to copy the performance of selected chords to the clipboard. NOTE: If your selected chords last longer than a full loop (Length x Lengths per loop), a special hybrid pattern will be generated that still fits within a single scaling time length. Pro-tip: Want to learn from a rhythmic pattern you've created in the Piano roll? Create the pattern first, then right-click on the relevant chord(s) and select Note linking > Link. Your original Piano roll notes will now define the chord, allowing you to "learn" its rhythmic performance. Use Paste to apply a copied performance to selected chords.
-
Saving and Deleting Performance Patterns: Created a killer performance pattern? Click Save pattern to save it as a User pattern. Need to declutter your pattern list? Select a user pattern in the combo box and click Delete Pattern.
-
Pattern Selector: Your Rhythmic Seeds: The Pattern selector dropdown offers a variety of pre-designed rhythmic patterns that act as starting points for performance generation. They also update the parameter knobs to reflect their characteristics. NOTE: When you select an Arp or Chop pattern, it will be rendered as-is, without applying the parameters on the right. However, hitting Regenerateor moving any parameter knobs will then apply those parameters to morph the pattern.
-
Performance Type: Shaping Your Chords in Time: This dropdown offers various ways to manipulate your chords rhythmically:
-
Arp: Arpeggiates the main notes of the chord, with the lowest note sustained.
-
Chop: Creates rhythmic divisions of the chords.
-
Humanize: Introduces subtle variations in note onsets, offsets, and dynamics to mimic the feel of human performance and strumming. NOTE: For Humanize, Scaling acts similarly to Length for chord generation, defining the length of a single time interval within a loop. A full phrase is considered to be (Scaling * Lengths per loop).
-
-
Performance Parameters: Fine-Tuning Your Rhythm: The parameters to the right of the Performance type dropdown allow you to customize the selected performance manipulation. These vary depending on the chosen type (Arp, Chop, Humanize), offering granular control over density, note repeats, articulation, on-beat emphasis, pattern bias, morphing, timing depth, dynamics depth, strum time, strum curve, phrasing weight, and phrasing offset. Experiment with these to create subtle or dramatic rhythmic effects.
-
Scaling: Defining Your Rhythmic Unit: The Scaling dropdown sets the time period for a single repeating chunk of the performance pattern. Choose from Beats to Bars to define this rhythmic unit. Each performance is created by looping the base pattern over time chunks of this length.
Advanced Control: Under the Hood of the AI
The Advanced section gives you deep control over the AI's generation process, allowing you to influence everything from chord extensions to harmonic complexity.
-
Fix Generate Seed: Maintaining Consistency: Select Fix generate seed to ensure consistency when tweaking parameters. With this enabled, the AI will use the same randomization "seed," leading to more predictable results as you adjust settings. Deselect it for more unpredictable and potentially surprising outcomes.
-
Extensions: Adding Harmonic Richness: The Extensions options let you control how chord extensions (like 7ths, 9ths, etc.) are added. Choose between substitute (replacing basic chord notes with extensions) or add (keeping the basic notes and adding extensions). The Frequency slider controls how often extensions are added, and Max per chord limits the number of extensions per chord.
-
Non-Diatonic Notes: Embracing the Unexpected: Increase the Non-Diatonic notes slider to encourage the AI to use chords and extensions that are outside the current scale, adding a touch of dissonance and harmonic intrigue.
-
Sampling Temperature: Controlling Harmonic Predictability: The Sampling temperature slider controls how "common" the chords in your progressions are. Lowering it encourages the AI to choose more common chord transitions, while increasing it leads to more unusual and less predictable progressions with more dissonances.
-
Chord Repeats: Adding Rhythmic Stability: Higher values for Chord repeats encourage the AI to repeat chords more often within each time loop. Setting it to the minimum ensures that two adjacent auto-generated chords will always be different.
-
Analysis Context: Seeing the Bigger Harmonic Picture: Larger values for Analysis context allow the AI to consider the longer-term chord transition sequence when analyzing, rather than just focusing on matching chords to the immediate notes. At a value of zero, it only considers notes within the current chord's time interval.
-
Looping Bias: Encouraging Repetition or Variety: The Looping bias knob influences how the AI chooses subsequent chords. Turning it clockwise encourages the AI to use similar or related chords on each generation loop, while turning it counter-clockwise encourages more experimentation and variety. NOTE: This knob only has an effect if your progression is long enough to have multiple loops.
-
Length per loop: Defining the AI's Phrase Length: Select the number of time intervals (defined by the Length setting in the top panel) that make up a single generation loop. This provides the AI with a metric context for generating progressions, analyzing existing melodies, and applying humanization effects. For example, chord progressions will tend to resolve towards the end of a loop, and humanization can be encouraged to create dynamic phrasing that spans the loop length.
Mastering shortcuts is the key to unlocking true speed and efficiency in any software, and the FL Studio Chord Progression Tool is no exception. Learning these handy key combinations will streamline your workflow, letting you focus on the creative flow rather than getting bogged down in menus. Here's a breakdown of essential shortcuts, categorized for easy reference:
Piano Roll - Chord Progression Tool Shortcuts
In the Piano Roll (Before Opening the Tool):
-
(Alt/Opt+P) - Open the Chord Progression Tool. (Important Note: This shortcut might conflict with other assignments in FL Studio. Keep an eye out and adjust if necessary for your setup.)
Inside the Chord Progression Tool:
-
Navigation & Zoom:
-
(Mouse wheel) - Scroll horizontally through your chord progression.
-
(Ctrl+Mouse wheel) - Zoom horizontally in or out on the progression.
-
(Shift+Z) - Zoom out to see the entire progression at once.
-
(Ctrl+Right-Click) - Zoom out fully for a complete overview.
-
-
Chord Manipulation:
-
(Shift+Mouse wheel) - Change the inversion of the chord you are hovering your mouse over. Quickly audition different voicings!
-
(Alt/Opt+Mouse wheel) - Transpose the hovered chord up or down in pitch. Experiment with different harmonic flavors on the fly.
-
(Alt/Opt+Right-Click) - Preview the sound of a single chord. Great for quickly checking how a chord sounds in isolation.
-
(Shift+Double-Click) on a chord boundary - Add a passing chord. Instantly create smoother transitions between your main chords.
-
(Double-Click) on a Chord - Show alternative chord suggestions for that position. Explore different harmonic possibilities with ease.
-
(Double-Click) on empty space in the progression - Create a new chord at that location.
-
(Del) - Delete the currently selected chord(s).
-
-
Selection & Editing:
-
(Ctrl+A) - Select all chords in the progression.
-
(Ctrl+D) - Deselect all chords.
-
(Ctrl+Click & Drag) - Select multiple chords by drawing a selection box around them.
-
(Ctrl+C) - Copy the selected chord(s).
-
(Ctrl+V) - Paste the copied chord(s) to the current position.
-
(Ctrl+Z) - Undo your last action.
-
(Ctrl+Alt/Opt+Z) - Redo your last undone action.
-
-
Playback & Snapping:
-
(Space) - Preview the entire chord progression.
-
(Backspace) - Toggle snapping on or off. Control whether chords snap to grid lines or can be placed freely.
-
(Alt/Opt+S) - Switch Shunt on/off. (This likely relates to bypassing or activating the effect of the Chord Progression Tool itself. Experiment to see its specific function in your workflow.)
-
-
Generation & More:
-
(Ctrl+G) - Generate a new chord progression based on the current settings. A quick way to get fresh ideas!
-
(Shift) During resizing a chord - Move the next chord's starting point if it's directly adjacent to the end of the current chord. Preserve smooth transitions while adjusting durations.
-
(Alt) During moving or resizing a chord - Temporarily ignore the snap setting. Allows for fine-grained adjustments without being constrained by the grid.
-
-
Related Posts
Get Beat Feedback & Production Tips on My Twitch Live
Why Analog Synth Sounds Are Making a Comeback

Top Loop Kits and Construction Kits for Music Producers 2025
Best VST Plugins for 2025: Top Picks for Trap, Pop, and Sound Design

Top 5 UAD Plugins for Mixing

Using the 1176 on Vocals: A Guide to Perfect Compression

African Dreamscape - Afro Beats - Amapiano : A Producer’s Guide